Photoshop Tutorials – Overlay Graphic on Peeling Paint

So if you’re anything like me, you see an image like this one here, and you think, “I want to do more stuff like that!” Well, let me walk you through a very simple process that I used to overlay my logo graphic on peeling paint image.
1. Get Your Peeling Paint Image Ready
Before you grab your Graphic or Logo, get your image ready by applying any saturation or exposure that you want to make it look just right.

2. Place, Past or Drag your Logo or Graphic into the Art-board
You may want to hide your Graphic to make the next step easier.
![]()
3. Select Either the Negative or Positive Space
In your image with peeling paint, notice that there are areas where your graphic would still stick to and areas where it would not stick to, because those areas have cracked or peeled away. Choose whichever area will be easier to select, the painted area or the non-painted area. For this image, I chose the non-painted area.
From the “Select” menu, choose “Color Range…” I found it easier to select the darker non-painted areas on this particular image.

Use the dropper tool to select your first area of negative or positive space. Hold down shift and click additional areas of negative or positive space so that all of the space you want to be selected is selected. Set the Selection Preview on the option that best enables you to see what you’re doing. Notice that I’ve adjusted the Fuzziness and Range to somewhere in the middle to make sure that I captured all the little cracks that I wasn’t able to grab with the dropper tool. When you’re finished click “OK”.
4. Layer Mask Your Logo or Graphic
Now you have a new selection. If your painted area is selected, you’re good to go. If your non-painted area is selected, you’ll want to click Command+Shift+I on a Mac or Control+Shift+I on a PC to invert your selection.
Now you’ll want to navigate to your layers panel. If you don’t know where it is, go to the “Window” menu and select “Layers”. Select the Layer that represents your Logo or Graphic. Then click the “Add layer mask” button as shown in the picture below. If you plan to move your Logo or Graphic around, I recommend unlinking the Layer from the Mask, so that the mask stays in place when you move the Graphic.

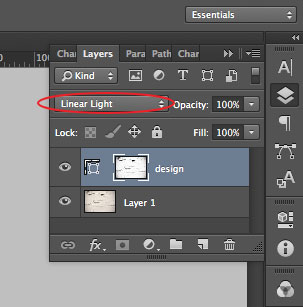
5. Set Your Graphic’s Blend Mode
The final step is to set your Graphic Layer’s Blend mode. This option is also in the layers panel. I recommend either Linear Light or Multiply for this particular application.
 I hope this has been helpful! Thanks for checking out my blog!
